Scrolling through this month’s “Most Wholesome Rescue Pet Photos” stories, one thing jumps out: people are reworking their homes overnight to welcome a new dog or cat. New gates go up, doors get fixed, mystery drafts finally get sealed—because suddenly there’s a curious animal testing every weak spot in the house.
If you’ve just adopted a pet (or you’re thinking about it), this is the perfect moment to tackle small repairs that make your place safer, warmer, and easier to live in—for them and you. Inspired by the surge of rescue pet adoptions highlighted in those viral photo compilations, here’s a practical, repair-focused checklist to “pet‑proof” and tune up your home right now.
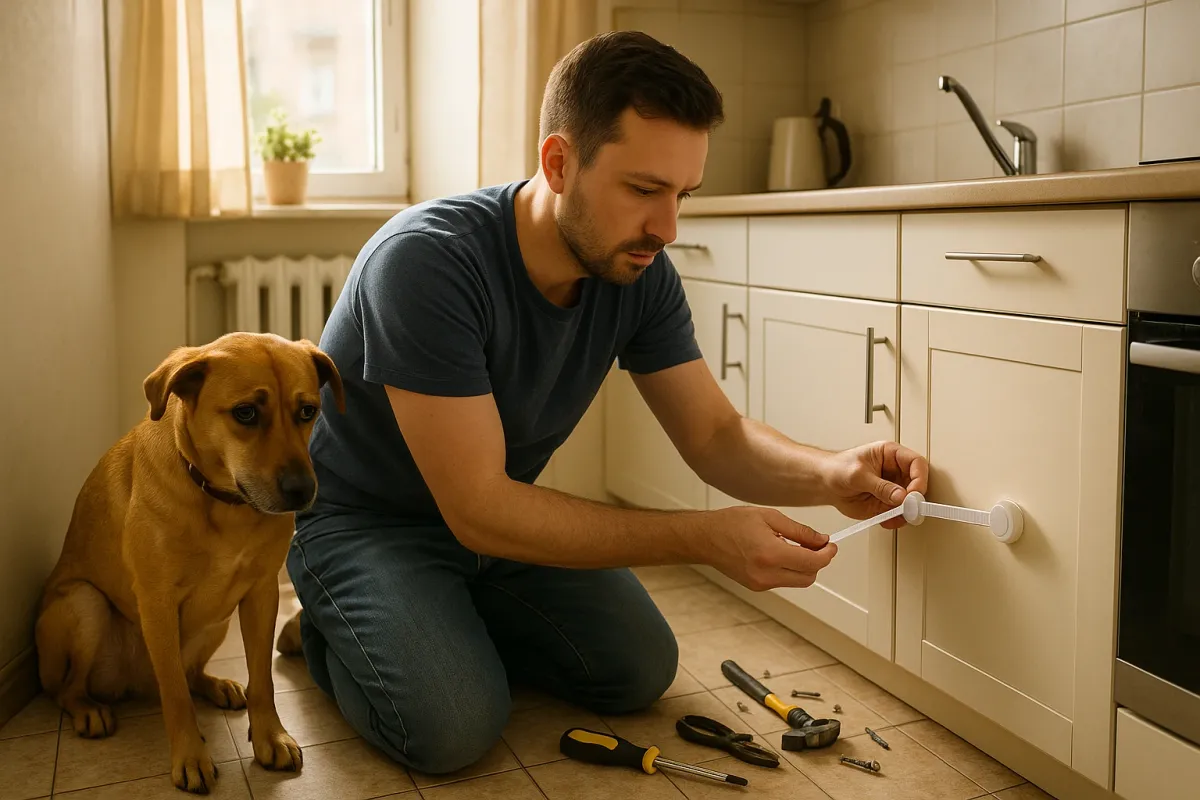
1. Turn Wobbly Interior Doors Into Solid, Pet‑Proof Barriers
Rescue pets are often anxious at first—and they will absolutely find the one door that doesn’t latch right. Fixing that isn’t just about convenience; it’s about safety and training.
Step-by-step:
Check the hinges first
Open the door halfway and gently lift the handle side. If you feel play or see the door move up and down, the hinges are loose. Tighten all hinge screws with a screwdriver (not a drill at first, to avoid stripping).
Replace stripped hinge screws
If a screw spins but won’t tighten, remove it. Fill the hole with 2–3 wooden toothpicks dipped in wood glue, snap them flush, and reinstall a slightly longer screw (same diameter). This gives the screw new wood to bite into.
Adjust a latch that doesn’t catch
Close the door slowly and watch where the latch hits the strike plate. If it hits above or below the opening, loosen the strike plate screws and slide the plate up or down slightly. Retighten and test. Repeat until the latch clicks cleanly every time.
Enlarge the strike plate opening (if needed)
If moving the plate doesn’t solve it, remove the plate and carefully file the opening with a metal file so the latch has more room. Reinstall and test.
Stop the door from swinging by itself
A self‑closing or self‑opening door can confuse or even bump a nervous pet. Pull the top hinge pin, lay it on a hard surface, and tap the center gently with a hammer to create a slight bend. Reinsert—this adds friction so the door stays put.
2. Repair Loose Baseboards Before They Become Chew Toys
Those wholesome adoption photos often show dogs curled up along baseboards or cats exploring every corner. Loose trim and gaps are irresistible to paws and teeth—and can hide drafts, bugs, and wiring.
Step-by-step:
Find loose sections
Run your hand lightly along the baseboards. Mark any soft, spongy, or visibly separated spots with painter’s tape so you don’t miss them later.
Secure with finish nails or trim screws
For wood baseboards over drywall, use 1.5–2" finish nails or trim screws aimed into wall studs (use a stud finder). Space them about every 16–24". Set nail heads slightly below the surface with a nail punch so pets don’t catch claws on them.
Use construction adhesive for stubborn gaps
Where the board has pulled away and nails alone won’t hold it flush, gently pry the trim out with a putty knife, squeeze a bead of construction adhesive at the back, then press and nail it back into place. Wipe away squeeze‑out immediately.
Fill gaps and holes
- Nail holes: fill with wood filler or paintable spackle, let dry, and sand smooth. - Gaps at the wall or floor: run a thin bead of paintable caulk and smooth with a damp fingertip or a caulk tool. This blocks drafts and keeps pet hair and dander from getting trapped.
Finish with pet‑safe paint or sealant
If you repaint, choose low‑ or no‑VOC paint. Let it cure fully before letting pets lick, chew, or rub against it—usually 24–48 hours with good ventilation.
3. Fix Drafty Windows So Your Pet’s Favorite Spot Isn’t Freezing
Rescue pet photos constantly show animals perched on window ledges, soaking in the world outside. But if those windows are drafty, that cozy sun spot is actually a cold, energy‑wasting leak. You don’t need new windows to fix a lot of common problems.
Step-by-step:
Find the leaks
On a cool or windy day, close all windows. Hold a lit incense stick or a damp hand around the frame, sash, and where the frame meets the wall. Smoke or cold air movement = leak. Mark trouble spots with painter’s tape.
Replace worn weatherstripping
- For sliding or double‑hung windows, pry off old foam or rubber strips. - Clean the surface with mild cleaner and let it dry. - Apply new adhesive‑backed weatherstripping in one continuous strip where the sash meets the frame—no gaps at corners. Press firmly.
Caulk fixed frame gaps
For non‑moving joints (where the frame meets the wall or trim), remove old, cracked caulk with a utility knife or caulk remover tool. Vacuum the dust, then run a thin, steady bead of paintable window/door caulk. Smooth it out and wipe away excess.
Use removable window film for the season
If you live somewhere cold and your pet loves a particular window, add clear insulating film to that window for winter. Cut it to size, stick on the double‑sided tape around the frame, apply the film, and shrink with a hair dryer. It’s removable in spring.
Secure loose interior sills
If the inside sill flexes when your pet jumps up, remove any loose trim, add a bead of construction adhesive underneath, then screw the sill into solid framing with countersunk wood screws. Fill screw heads, sand, and repaint. This prevents cracks and splinters.
4. Make Slippery Stairs Safe With A Quick Tread Repair
The rescue pet trend has brought a lot of “first time on stairs” videos—and just as many awkward slips. Smooth wood, worn carpet, or loose nosings can be dangerous for animals and humans alike. Fixing them doesn’t always mean a full remodel.
Step-by-step:
Inspect each step slowly
Walk the stairs while lightly shifting your weight on each tread. Listen for creaks and feel for movement. Look for shiny, worn finishes or loose carpet edges—especially at the front (the nosing). Mark problem steps.
Tighten creaky or moving treads
From underneath (in a basement or accessible ceiling), add wood screws through the tread into the stringer. If you can’t access from below, use trim screws angled from the top near the back of the tread into the riser, then fill and sand the heads.
Secure carpet edges
Re‑stretch loose carpet by pulling it tight toward the riser, then use a carpet stapler or finish nails every few inches along the underside of the nosing. For edges that meet a wall, tuck carpet snugly using a putty knife or carpet tucking tool.
Add non‑slip solutions
If you don’t want carpet, add: - Adhesive anti‑slip stair strips across each tread, or - A clear non‑slip coating made for wood floors. Clean thoroughly first so adhesives and coatings bond well. Check that surfaces are dry before pets use the stairs again.
Check railing and baby gates
If you’re using baby gates to manage where your new pet can roam, tighten all mounting hardware and confirm bars are close enough that a small head or paw can’t slip through. Railings should not wobble—tighten brackets or add new anchors into studs as needed.
5. Tame Cords, Outlets, and Lamps Before Curious Paws Find Them
Those heartwarming rescue photos of cats napping behind TVs and dogs snuggled near floor lamps hide a real issue: modern homes are full of loose cords and overloaded outlets. A little DIY work can drastically reduce shock and chewing risks.
Step-by-step:
Map “chew zones” at pet height
Sit or crouch on the floor and look around the edges of each room, especially where you plan to feed or bed your pet. Note any exposed lamp cords, dangling power strips, or overloaded outlets.
Install cord covers along walls
Use adhesive plastic cord channels (raceways) to bundle and hide cords that run along baseboards. Cut to length with a fine‑tooth saw or utility knife, stick them down, lay in the cords, and snap the covers shut.
Shorten and secure excess cable
Coil long cords using Velcro straps or reusable cable ties. For anything running near a pet bed or litter area, lift and secure cords to the wall or furniture using stick‑on hooks so they’re off the floor.
Upgrade loose or damaged outlets
If an outlet face is cracked, feels warm, or plugs fall out easily, it’s time to replace it. Turn off power at the breaker, verify with a non‑contact voltage tester, then swap in a new tamper‑resistant outlet (TR‑rated). Follow the wiring pattern from the old outlet exactly: black (hot) to brass, white (neutral) to silver, green/bare (ground) to green screw.
Anchor lamps and small devices
For tall or top‑heavy lamps in high‑traffic areas, stick furniture anchors or museum putty under the base to prevent tipping. If you have smart speakers or Wi‑Fi routers sitting at edge height, slide them farther back and secure cables so a racing cat or dog can’t yank them down.
Conclusion
The surge of heartwarming rescue pet stories this month isn’t just about cute photos—it’s a reminder that our homes usually only get fixed when someone new is counting on them. A wobbly door, loose baseboard, drafty window, slippery stair, or tangles of cords might have been “fine for now” last year, but they become real hazards when a curious, nervous animal is exploring for the first time.
Tackle these repairs one small project at a time. You’ll make your home safer and more comfortable for your new companion—and you’ll quietly upgrade your own everyday life in the process.
Key Takeaway
The most important thing to remember from this article is that this information can change how you think about Home Repairs.


