If you’re tired of paying shop rates for problems you might be able to tackle in your driveway, you’re not alone. Many common car issues look intimidating but are actually manageable with basic tools, a bit of patience, and solid guidance. This guide walks you through five practical, step‑by‑step repair jobs that most DIY‑minded drivers can handle safely at home—no lift, no fancy scanner, just careful work and the right approach.
Before You Start: Safety, Tools, and Realistic Limits
Before turning a single bolt, set yourself up for success.
Work on a flat, stable surface, ideally with good daylight. Always chock the wheels (blocks behind tires) when lifting the car, and never rely on a jack alone—use jack stands rated for your vehicle’s weight. Keep a fire extinguisher rated for flammable liquids nearby if you’re working around fuel or electrical systems.
Your basic tool kit should include a quality socket set (metric and SAE), combination wrenches, screwdrivers, pliers, a torque wrench, a tire pressure gauge, a multimeter, and a flashlight or headlamp. Nitrile gloves and safety glasses aren’t optional—they’re cheap insurance against injuries.
Finally, know your limits. Anything involving airbags, high‑pressure fuel lines, structural rust, or major brake hydraulics is usually best left to professionals. For every job below, cross‑check the steps with your vehicle’s owner’s manual or a model‑specific service manual. If something looks different on your car, stop and confirm before proceeding.
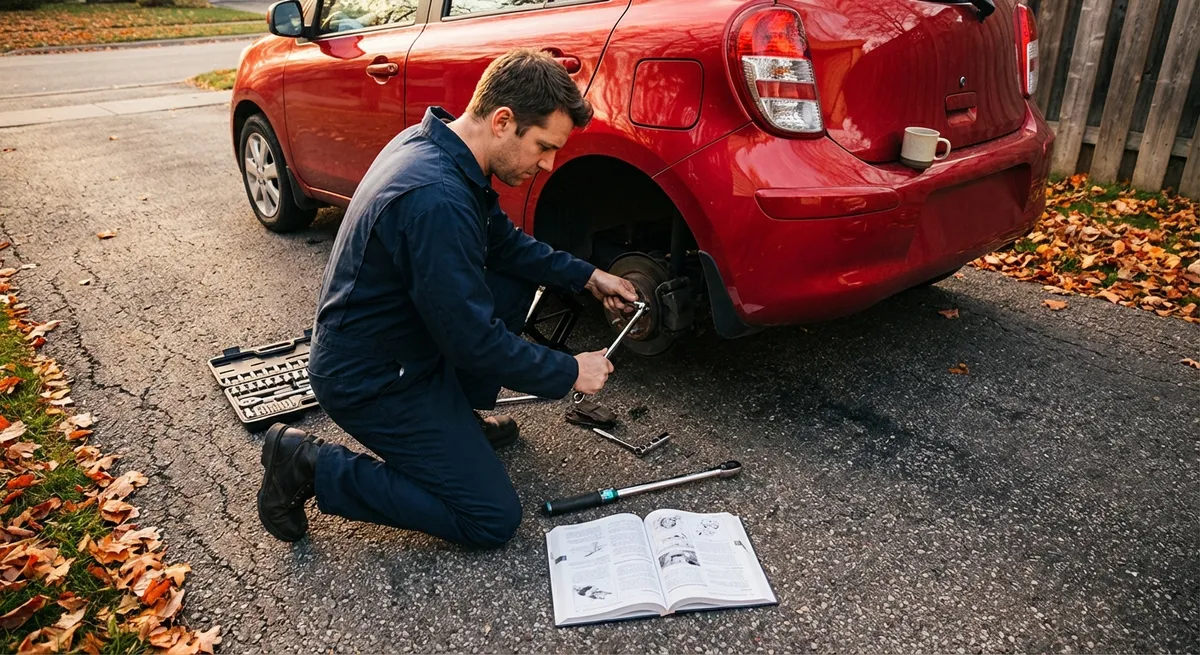
Step‑By‑Step Tip #1: Replace Worn Brake Pads the Right Way
Brake pad replacement is one of the most impactful DIY jobs you can do. If you’re already comfortable removing wheels, this is a logical next step—provided you work slowly and methodically.
What you’ll need: Jack and jack stands, lug wrench, basic socket set, C‑clamp or brake caliper tool, new pads, brake cleaner, wire brush, bungee cord or wire hanger, torque wrench.
Steps:
Secure and lift the vehicle
Park on level ground, set the parking brake (for front brakes; leave off if working on rear brakes that use the parking brake shoes), and chock the wheels. Loosen the lug nuts slightly, jack up the vehicle at the recommended lift point, then support it securely on jack stands. Remove the wheel.
Inspect the caliper and hardware
Locate the brake caliper over the rotor. Check for wetness or leaks around the brake hose and caliper. If you see fluid, stop—this is beyond basic pad replacement. Note how the pads sit in the caliper bracket; a quick photo with your phone helps during reassembly.
Remove the caliper and old pads
Remove the caliper slide bolts (usually on the backside). Gently wiggle the caliper off the rotor and support it with a bungee or wire to avoid stressing the hose. Remove the old brake pads and any retaining clips or shims. Do not let the caliper hang by the hose.
Compress the caliper piston
Place an old pad against the piston and use a C‑clamp or caliper tool to slowly push the piston back into the caliper. Go slowly to avoid damaging seals. Keep an eye on the brake fluid reservoir under the hood; if it starts to get too full, remove a small amount with a clean syringe or turkey baster.
Clean and prep the bracket
Use a wire brush to clean the caliper bracket where the pad hardware sits. Spray lightly with brake cleaner and let dry. Install new hardware (clips) if provided. A tiny amount of high‑temp brake grease on the pad ears and slide pins (if accessible) reduces noise and ensures smooth movement.
Install new pads and reassemble
Place the new pads into the bracket, matching the orientation of the old ones. Reinstall the caliper over the pads and rotor. Reinsert and tighten the slide bolts to the manufacturer’s torque spec (often listed in a service manual or online for your model).
Reinstall wheel and test
Put the wheel back on, snug the lug nuts by hand, lower the car, then torque the lugs in a star pattern to spec. Before driving, pump the brake pedal several times until it feels firm to seat the pads against the rotors. Test at low speed in a safe area.
Step‑By‑Step Tip #2: Fix a Check Engine Light from a Loose or Failing Gas Cap
A glowing check engine light doesn’t always mean a major repair. One of the most common—and easiest to fix—issues is a problem with the fuel system’s evaporative (EVAP) seal, often traced back to the gas cap.
What you’ll need: OBD‑II scanner (many auto parts stores loan them), replacement gas cap (if needed), clean rag.
Steps:
Check the gas cap first
Turn off the engine and inspect the gas cap. Make sure it’s present, not cracked, and that the rubber seal isn’t torn or brittle. Remove the cap, wipe the sealing surface on the cap and filler neck with a clean rag, then reinstall until it clicks firmly.
Use an OBD‑II scanner to read the code
Locate the OBD‑II port (usually under the dash near the steering column). Plug in the scanner with the ignition in the ON position (engine off, unless the scanner instructs otherwise). Read the stored trouble codes—EVAP‑related codes often start with P0440, P0442, P0455, or similar.
Confirm it’s an EVAP/gas cap issue
If the code description mentions “EVAP system small leak,” “gross leak,” or “incorrect purge flow,” a failing gas cap or sealing issue is a prime suspect. If you see unrelated codes (like misfires or oxygen sensor faults), this guide won’t solve that issue.
Replace the gas cap if suspect
If the cap is old, damaged, or the seal looks questionable, purchase an OEM or high‑quality replacement designed for your vehicle. Avoid ultra‑cheap generic caps; poor fit can keep the problem going.
Clear the code and drive
Use the scanner to clear the code. Then drive normally for several days. The vehicle may need multiple “drive cycles” to recheck the system. If the code doesn’t return, you likely fixed it. If it comes back, the EVAP system may have leaks at hoses, valves, or the charcoal canister—typically a job for someone with smoke‑test equipment.
Step‑By‑Step Tip #3: Restore Headlight Clarity for Safer Night Driving
Cloudy, yellowed headlights don’t just look bad—they cut down your visibility. Headlight restoration is a low‑risk, high‑reward project that can transform your nighttime driving and your car’s appearance.
What you’ll need: Headlight restoration kit (or sandpaper 600–3000 grit, plastic polish, UV sealant), masking tape, spray bottle with water, microfiber cloths.
Steps:
Mask off surrounding paint
Clean the headlights with soap and water and dry them. Use painter’s tape to mask the paint, trim, and edges around the lenses. This protects your car’s finish if your hand slips while sanding.
Wet sand the surface (if using a manual kit)
Starting with the coarsest grit recommended (often 600–800), wet the sandpaper and lens, then sand in straight, overlapping strokes. Rinse frequently and keep the surface wet. Progressively move to finer grits (1000, 1500, 2000, 3000), changing direction (horizontal to vertical) with each grit so you can see when previous scratches are removed.
Polish to clarity
Apply a plastic polish or the compound from your kit to the lens. Using a microfiber cloth or drill‑mounted pad (if the kit includes one), buff in small circles until the surface looks clear and glossy. Wipe clean with a fresh cloth.
Apply a UV sealant
The most important step: apply a UV‑resistant clear coat or sealant specifically made for headlights. Without this, the lenses will quickly re‑yellow. Follow the product instructions carefully—many require the lens to be completely dry and free of residue.
Cure and maintain
Allow the coating to cure for the recommended time (often a few hours) before driving in rain or washing the car. To extend the life of your work, wash bug splatter and road grime regularly and avoid harsh abrasives on the lenses.
Step‑By‑Step Tip #4: Track Down and Fix a Parasitic Battery Drain
If your car repeatedly has a dead battery even after installing a new one, you may have a parasitic drain—something electrical staying on when the car is off. You can often pinpoint the culprit with some patience and a multimeter.
What you’ll need: Digital multimeter (with 10A setting), wrench for battery terminals, notepad/phone for tracking fuses, basic fuse puller or needle‑nose pliers.
Steps:
Prepare the vehicle
Fully charge the battery, then shut off the car, remove the key, and close all doors (use the latch to “fake” closed doors if you need them open for access). Wait 15–30 minutes to allow onboard electronics to enter sleep mode.
Set up the multimeter
Set your multimeter to measure DC amps (start with the 10A range). Disconnect the negative battery cable. Connect the multimeter in series: one lead on the negative battery post, the other lead on the removed negative cable. Ensure solid contact before proceeding.
- Assess normal vs. excessive draw
Modern cars may show a resting draw around 20–50 milliamps (0.02–0.05 A). Anything consistently above about 0.1 A (100 mA) is suspect. If your meter is pegged on the 10A setting, stop; you may have a significant short or something still on.
Pull fuses one at a time
With the meter still connected, locate the main fuse boxes (under the hood and/or under the dash). Pull one fuse at a time while watching the multimeter. When the current suddenly drops to a normal level, you’ve found the circuit that’s draining power. Note which fuse and circuit label this is.
Identify common culprits
Once you know the problem circuit (e.g., interior lights, radio, power seats), inspect components on that circuit. Look for glovebox or trunk lights staying on, aftermarket audio gear, phone chargers in 12V outlets, or stuck relays. Unplug accessories or modules on that circuit to see if the draw goes away.
Decide on a DIY fix or pro help
Simple fixes include removing a stuck bulb, replacing a faulty switch, or disconnecting an aftermarket accessory. If the issue involves complex modules, control units, or CAN‑bus wiring, document your findings and have a professional handle the deeper diagnosis.
Step‑By‑Step Tip #5: Quiet Squeaks and Clunks in the Suspension
Annoying noises over bumps or while turning don’t always mean catastrophic failure. Some squeaks and clunks come from dry bushings or loose, easy‑to‑reach components. While suspension safety is critical—and anything structural or heavily worn should go to a shop—you can often identify and sometimes resolve minor issues.
What you’ll need: Jack and jack stands, pry bar, flashlight, silicone spray or rubber‑safe lubricant, torque wrench, helper to bounce the car.
Steps:
Recreate the noise safely
Drive slowly on a known bumpy road or into a driveway at an angle to identify when the noise occurs (bumps, turns, braking). Take notes so you can focus your inspection on likely areas: front vs. rear, left vs. right, only while turning, etc.
Inspect with the vehicle lifted
Safely raise and support the car. With a flashlight, look for obvious issues: torn rubber bushings, leaking shocks/struts, loose sway bar links, or metal‑on‑metal contact. Light surface rust is normal; cracks, broken mounts, or severe rust are not.
Check for play in key components
Grasp the tire at the 12 and 6 o’clock positions and rock it—excess movement can suggest ball joint or bearing issues. Rock at 3 and 9 o’clock to check tie rod ends. Any clunking or large movement needs professional attention; don’t ignore it.
Lubricate rubber contact points (carefully)
Some squeaks come from dry rubber bushings (like sway bar or control arm bushings). Use a rubber‑safe silicone spray (not petroleum grease) on the outside of the bushings and where they contact metal mounts. Avoid spraying brake components or rotors.
Tighten accessible fasteners to spec
If you find slightly loose sway bar brackets or link nuts, snug them down with the correct tools and torque specs from a service manual. Never “guess‑tighten” structural suspension bolts—overtightening can be as dangerous as under‑tightening.
Test drive and reassess
Lower the vehicle, torquing wheel lugs correctly. Take a short drive over the same conditions that caused the noise. If the sound improves or disappears, monitor over the next week. If it persists or worsens—or if you spot play, cracks, or leaks—book an inspection with a qualified mechanic.
Conclusion
DIY auto repair isn’t about doing everything yourself; it’s about choosing the right battles. Replacing brake pads, resolving minor check engine light issues, restoring headlights, tracking down small battery drains, and quieting non‑critical suspension noises are all realistic wins for a careful, motivated driver. Each successful repair builds your confidence, saves money, and makes you a more informed car owner—so when it’s time to visit a professional, you’ll know exactly what you’re talking about.
Always cross‑check procedures with your specific vehicle’s documentation, take your time, and err on the side of safety. With the right approach, your driveway can double as a capable, cost‑cutting workshop.
Sources
- [NHTSA: Vehicle Maintenance & Safety](https://www.nhtsa.gov/equipment/tires-maintenance-repair) - U.S. government guidance on safe vehicle maintenance practices and safety considerations
- [AAA Car Repair & Maintenance Resources](https://exchange.aaa.com/automotive/car-repair-maintenance/) - General car care information, including brakes, batteries, and warning lights
- [Brake Pad Replacement Basics – Bridgestone Tires](https://www.bridgestonetire.com/learn/maintenance/brakes/how-to-replace-brake-pads/) - Step‑by‑step brake pad replacement overview and safety tips
- [Headlight Restoration Guide – Consumer Reports](https://www.consumerreports.org/cars/how-to-restore-your-cars-headlights-a6652992260/) - Independent testing and advice on restoring cloudy headlights and choosing products
- [Parasitic Battery Drain Diagnosis – Popular Mechanics](https://www.popularmechanics.com/cars/how-to/a3393/4286849/) - Practical explanation of tracking down battery drains using a multimeter
Key Takeaway
The most important thing to remember from this article is that this information can change how you think about Auto Repair.


